Change how desktops look and work
To control how files and devices are accessed, use the buttons on the Desktop Viewer toolbar.
The virtual desktop can be a published virtual desktop, or a shared or dedicated desktop. In this access scenario, the Desktop Viewer toolbar functionality allows you to open a virtual desktop in a window and pan and scale that desktop inside your local desktop.
A toolbar grip button is displayed at the top of the window or (if maximized) the screen.
Click the toolbar grip  button. The Desktop Viewer toolbar appears as follows:

For more information on Desktop Viewer, see the Desktop Viewer toolbar section. Also, see Desktop Viewer section in the product documentation.
Note:
Contact your admin if you aren’t able to view the Desktop Viewer toolbar.
To move the toolbar to another position on the screen
You can move the toolbar so that it does not obscure the other window’s content or controls.
- Click the toolbar grip that appears at the top of the window, and move it left or right.
The toolbar allows you to perform the following actions:
The enhanced Desktop Viewer toolbar provides the following options:
- Show or hide toolbar: Click this button to show or hide the Desktop Viewer toolbar.
- Switch desktop: Click this button to see the available open desktops. You can switch to another desktop by clicking the desktop that you want to access. The opened desktop shows in the front.
- Ctrl+Alt+Del: Click this button to bring up the task manager on your virtual desktop.
-
Shortcuts: Click this button to see the available shortcuts. The following are the available shortcuts:
- Start menu: Click to access the start menu on the virtual desktop.
- Switch app: Click this button to see the available open apps. You can switch to another app by clicking the app that you want to access.
- Devices: Click this button to access the devices you have connected.
- Preferences: Click this button to access the options in the Preferences section and edit your preferences.
- Connection: Click this button to analyze the connection strength with real-time stats of your connection.
- Multi-monitor: Click this button to navigate to the different options of extending your session across multiple monitors.
-
Minimize: Click the Minimize button to minimize the current virtual desktop session that you are using.
Note:
In the old Desktop Viewer toolbar, the Home option minimized all virtual desktop sessions on the same monitor.
- Fullscreen or Restore: Click the Fullscreen button to expand the desktop session to full screen.Click the Restore button to restore to the window mode. In the old Desktop Viewer toolbar, the corresponding option for Fullscreen or Restore is labeled Fullscreen or Window.
- Disconnect / Sign out: Click this button to sign out or to disconnect from a virtual session.
You can drag the toolbar across the screen and snap it to any edge of the screen. It supports both vertical and horizontal layouts.
To control how local files are accessed
A virtual desktop might need to access files on your local computer. You can control the extent to which the access is granted.
-
On the toolbar, click Preferences > File Access and select one of the following options:
Option Description Read and write Allows the virtual desktop to read and write to local files. Read only Allows the virtual desktop to read but not write to local files. No access Does not allow the virtual desktop to access local files. Ask me each time Displays a prompt each time the virtual desktop must access local files. -
Click OK.
To set up a microphone or a webcam
Follow this procedure if you want to change the way your virtual desktop accesses a local microphone or webcam.
-
On the toolbar, click Preferences > Connections, and select one of the following options:
Option Description Connect automatically Allows the microphone or webcam to be used on the virtual desktop. Do not connect Does not allow the usage of microphone or webcam on the virtual desktop. Ask me Prompts when the virtual desktop must access the microphone or webcam. - In Global Settings, select your Preferred Webcam.
- Click OK.
Limitation
- The Preferred Webcam dialog appears even when the Windows Media Redirection policy is set to Disabled on the Delivery Controller.
Changing USB device auto-connection preferences
Citrix Workspace app automatically connects USB devices tagged with CONNECT action based on the preferences set for the current desktop resource. You can change the preferences in the Desktop viewer toolbar as shown in the following image.
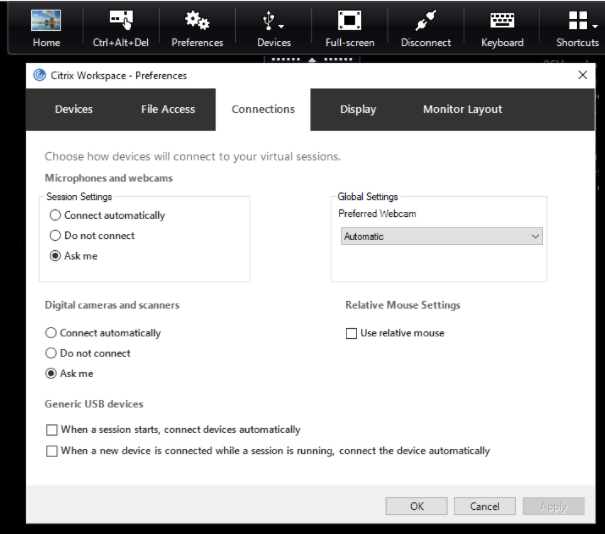
The two check boxes at the bottom of the pane controls if the devices must connect automatically or wait for manual connection in the session. These settings aren’t enabled by default. You can change the preferences if generic USB devices must be connected automatically.
Note:
Administrator can override the user preferences by deploying the corresponding policies.
Background blurring for webcam redirection
Citrix Workspace app for Windows now supports background blurring for webcam redirection. Select Preferences > Connections > Enable background blur check box to enable this feature.
To set up digital cameras or scanners
Follow this procedure if you want to change the way your virtual desktop accesses a local microphone or webcam.
-
On the toolbar, click Preferences > Connections, and select one of the following options:
Option Description Connect automatically Allows the digital cameras or scanners to be used on the virtual desktop. Do not connect Does not allow the usage of digital cameras or scanners on the virtual desktop. Ask me Prompts when the virtual desktop must access the digital cameras or scanners. -
Click OK.