Import and install certificates in Citrix Secure Access app
Important:
Starting from release 23.11.1, Citrix SSO for iOS is renamed to Citrix Secure Access. We are updating our documentation and the UI screenshots to reflect this name change.
For administrator-specific instructions on Citrix Secure Access for iOS, see Citrix Secure Access for iOS and Citrix Secure Access for macOS.
Citrix Secure Access on iOS supports client certificate authentication with NetScaler Gateway. Certificates can be delivered to the Citrix Secure Access in the following ways:
- MDM server - Preferred approach for MDM customers. Certificates are configured directly on the MDM-managed VPN profile. Both VPN profiles and certificates are then pushed to enrolled devices when the device enrolls into the MDM server. Follow MDM vendor-specific documents for this approach.
-
Email - Only approach for non-MDM customers. Administrators send an email with the User Certificate identity (Certificate and private key) attached as a PKCS#12 file to users. Users must have their email accounts configured on their iOS device to receive the email with an attachment. The file can then be imported to the Citrix Secure Access on the iOS.
Note:
File name extensions
.pfxand.p12are claimed by the iOS system and cannot be claimed by third-party apps such as Citrix Secure Access. Therefore, administrators must change the Extension/MIME type of the user certificate, from standard.pfxor.p12to.citrixsso-pfxor.citrixsso-p12respectively.
-
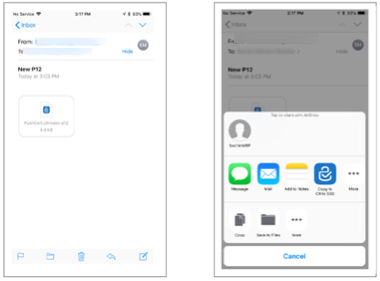
Open the email with the user certificate identity (certificate and private key) attached as a PKCS#12 file.
- Tap on the attachment to reveal the system OpenIn menu.
- Tap Copy to Citrix SSO.
-
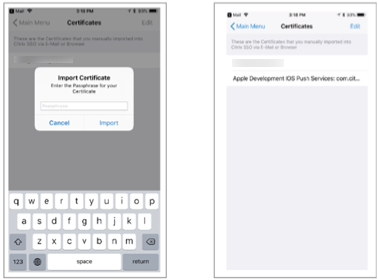
Install certificate in Citrix Secure Access.
The app is now launched and a prompt for the certificate passphrase is displayed. Enter the correct passphrase for the certificate to be installed into the app’s keychain and click Import.
Upon successful validation, the certificate is imported.
-
Use certificate-based authentication with VPN.
- To use the certificate for VPN authentication, you must first create a VPN configuration or a profile on Citrix Secure Access.
- Navigate to the VPN Connections view and tap Add VPN Configuration.
- On the configuration view of the VPN profile, you can select the imported certificate in the Certificates section.
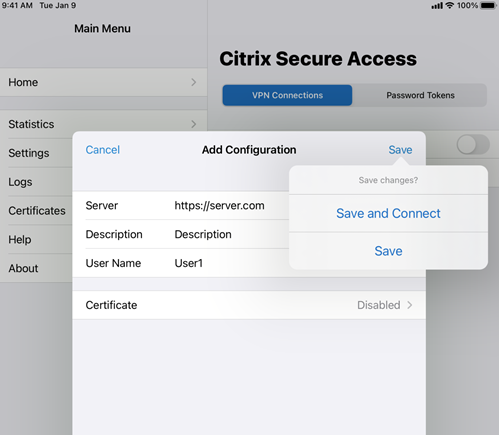
- Tap Save to import the certificate.
- To use the certificate for VPN authentication, you must first create a VPN configuration or a profile on Citrix Secure Access.
-
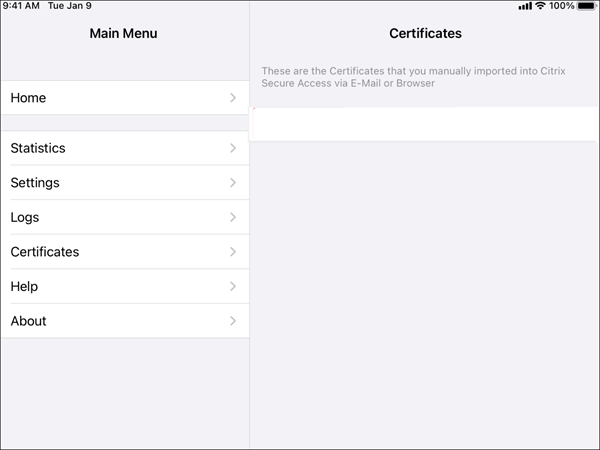
Manage certificates.
To manage the certificates imported into Citrix Secure Access navigate to the Certificates tab in Main Menu.