Connect to your corporate network using Citrix Secure Access configured in an Intune environment
Note:
For administrator-specific instructions on Citrix Secure Access for Android, see Citrix Secure Access for Android devices.
This topic captures details about connecting to your corporate network using Citrix Secure Access client configured in the Microsoft Intune Android Enterprise environment.
Assumptions:
- You have enrolled the device in Intune using Intune Company Portal app.
- Work profile for the user is set up on the device.
-
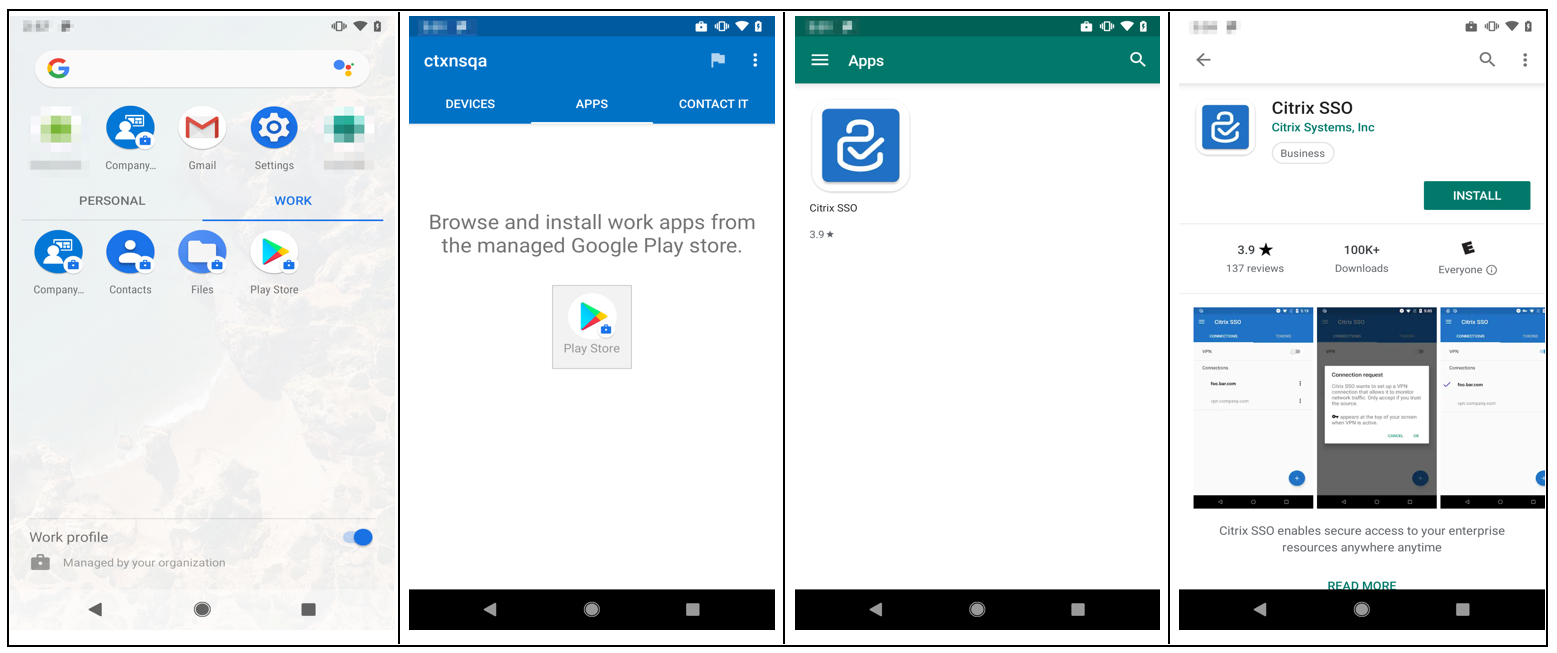
Open Intune Company Portal app on the device from the work profile.
-
Click the three dots menu to open settings for the app and scroll to the bottom of the screen. Tap SYNC to sync with the Intune server and then navigate to the main app screen.
-
Tap on the APPS tab and tap on the Managed Google Play Store link.
The list of approved apps for the user appears.
-
Tap Citrix Secure Access.
The Citrix Secure Access client appears in the Managed Google Play store.
-
Tap INSTALL.
-
Navigate back to the work profile apps list. The Citrix Secure Access is added to the installed app list.
-
Tap the Citrix Secure Access icon in the WORK profile app list to open it.
Citrix Secure Access opens. You are prompted to allow or disallow permission to communicate securely with your company’s internal network.
-
Tap ALLOW to grant the permission. Citrix Secure Access closes if you choose DON’T ALLOW and you cannot use the Citrix Secure Access client.
Note:
You might be prompted to allow or deny permission to manage and make phone calls (if not already granted via Intune). Tap Allow to grant permission. You may deny this permission but if Intune NAC check is required for device authentication on NetScaler Gateway, you cannot connect to your company’s internal network until you grant this permission.
-
The My Corporate VPN (or the name you chose in the Citrix Secure Access configuration in Intune) is listed in the Managed Connections section of the CONNECTIONS tab. Tap on this connection, you are prompted for the credentials to authenticate with NetScaler Gateway.
-
Provide credentials for authentication with NetScaler Gateway and tap LOG IN.
You may be prompted to select a certificate if client certificate authentication is configured on NetScaler Gateway. You can provide access to the certificate.
-
You are prompted by Android system to allow Connection request for VPN tunnel setup. Tap OK to grant Citrix Secure Access permission to establish secure connection with your internal company network.
Note: This prompt is only displayed when you establish a secure connection to NetScaler Gateway for the first time. It is not displayed for subsequent connection attempts until Citrix Secure Access is uninstalled and then installed again on the device.
You are connected to your internal company network. A key icon appears in the device status bar notifying you that VPN connection is active. Citrix Secure Access client’s VPN service notification icon also appears on the status bar. The connect switch changes its state to connected and a check mark icon appears next to the VPN profile name.